Admin quick start: set Yrney up in the right order
The 8 steps that make everything else easy. Do them in this order.
Yrney runs on one idea: you tell us how your brokerage is organized and what a new agent has to do, and we run the rest. Setting up in the wrong order means redoing work — regions have to exist before offices, offices before people, roles before tasks.
If you're brand new, our guided setup walks you through most of this the first time you sign in. This article is the map, and what to do if you skipped a step.
1. Branding
Logo, brokerage name, Federal EIN, website, support email and phone, brand color, welcome video. Your EIN pre-fills tax forms later, so enter it now. Guide →
2. Calendar settings
Set your brokerage time zone and tidy up event categories before anyone creates an event. Guide →
3. Commission plans
Name, value, and an external ID for your back office. Agents get assigned a plan when you create them. Guide →
4. Organization
Regions, then offices, then teams. Offices need a code if you're integrating with a back-office system. Guide →
5. Roles
Assign a primary holder to every role, company-wide, per region, or per office. This is what makes tasks land on the right desk. Guide →
6. Intake forms
What a new agent fills out the first time they sign in. Build one per agent type. Guide →
7. Task library and e-sign templates
The engine. Build tasks by role, attach documents to sign, wire up triggers. Guide →
8. Add your first person
Now People works properly: office, team, role, commission plan, onboarding plan, and intake form are all there to pick from. Guide →
The one rule worth remembering. Get the workflow section dialed in and the rest of the engine just runs. Everything else is settings; the task library is the product.
Still stuck? Contact your brokerage's Yrney admin, or email support@yrney.com.
Settings · 3 min read
Branding: make Yrney look like your brokerage
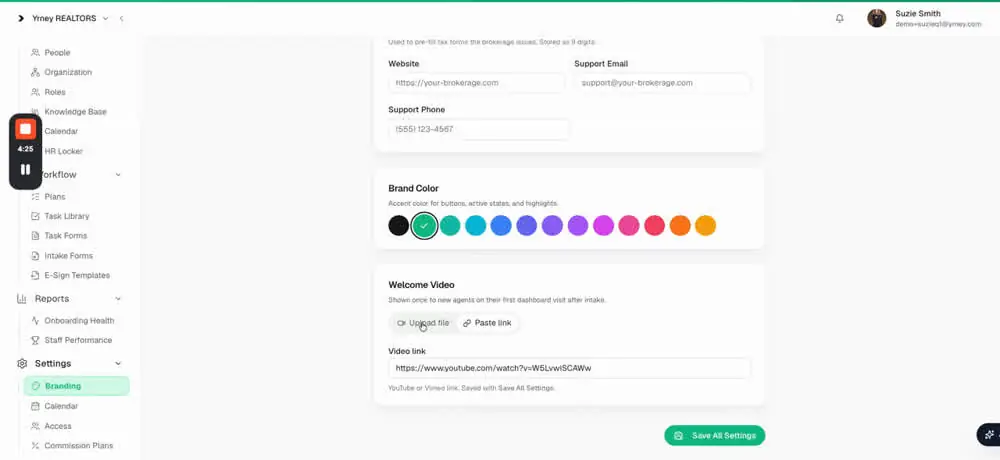
Settings → Branding. Logo, details, brand color, and the welcome video agents see at the end of intake.
Logo
Upload a PNG or SVG, 5 MB max. It shows in the light-mode navigation for everyone in your brokerage, so use the version of your mark that reads well small.
Settings → Branding: brand color and the welcome video.
Brokerage details
Field
What it does
Name
How your brokerage is named everywhere in the product and on outgoing communications.
Federal EIN
Stored as 9 digits and used to pre-fill tax forms your brokerage issues. Enter it once and stop typing it on every document.
Website
Your public site. Used in agent-facing communications.
Support email
Where agents are pointed when they need a human.
Support phone
Same, for people who'd rather call.
Brand color
Your accent color. It carries through the agent's experience so onboarding feels like your brokerage, not like software.
Welcome video
This is the piece most brokerages forget, and it's the best one. Add a video and it plays for the agent at the end of intake — the moment they've just finished their paperwork and are wondering what they joined.
Paste a link (YouTube or Vimeo), or
Upload an MP4 directly.
What to put in it. 60–90 seconds from the broker/owner. Welcome them by brokerage name, say what happens in the next 3 days, and tell them who to text if they're stuck. It doesn't need production value — it needs a face.
Still stuck? Contact your brokerage's Yrney admin, or email support@yrney.com.
Settings · 4 min read
Calendar settings: time zone, categories, and sending to real calendars
Settings → Calendar. Small screen, big consequences.
Brokerage time zone
Event times are entered and shown as written. The time zone is what they mean when they leave Yrney — on a calendar invitation, or when someone adds an event to their own calendar. Set it before you create events.
Event categories
Categories are how events are grouped and colored on the calendar. A few are built in (Company, Office, Training) and can't be deleted, but you can rename them and change their colors — renaming one updates it everywhere, and existing events keep their category. Add your own with Add category.
Keep the list short. Five or six categories that everyone understands beat twenty that nobody filters by.
Send events to real calendars
With this on, every published event is sent as a calendar invitation to the people who can see it, so it lands on their Google or Outlook calendar without anyone opening Yrney. Invitations come from the event author's own connected calendar; someone who hasn't connected one sends nothing, and the composer warns them. Editing an event updates the invitation, deleting it cancels the invitation. Whether an invitation asks people to reply is set per event, with the RSVP toggle.
Turn this on deliberately. While it's off, events live on the Yrney calendar only and RSVPs are collected in Yrney. The first send can't be recalled — so switch it on when you're ready for agents to start receiving invitations, and try it on a small audience first.
Why this matters more at a brokerage than anywhere else
Not every agent gets a company email address, so shared company and office calendars have never really worked — most brokerages have a pile of workarounds instead. A company-wide calendar that can also be office-specific fixes that for everybody, whether or not the agent has your domain on their email.
Still stuck? Contact your brokerage's Yrney admin, or email support@yrney.com.
Settings · 3 min read
Commission plans: set them up once, stamp them everywhere
Settings → Commission Plans. Three fields. Don't overthink it.
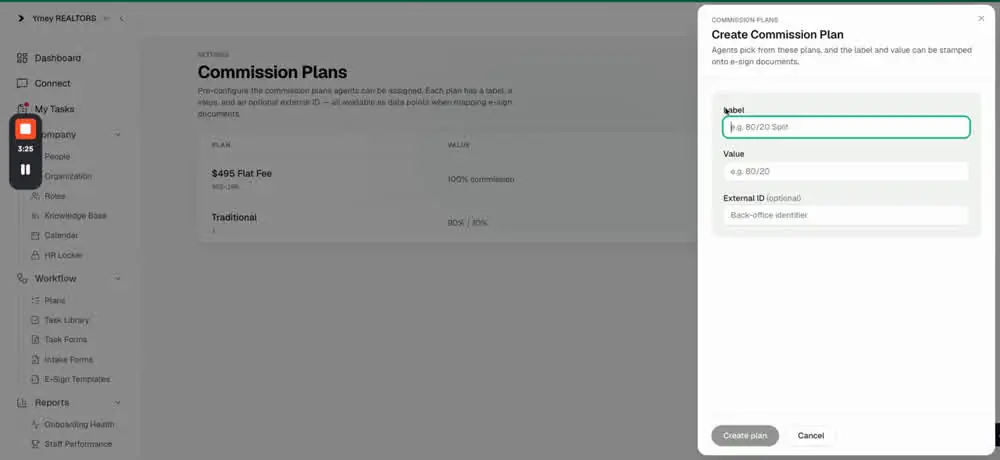
Pre-configure the plans agents can be assigned. You don't need your full commission schedule in here — just enough to identify the plan, put it on paperwork, and hand it to your back office.
Creating a commission plan — label, value, and back-office external ID.
Field
Example
Why
Label
80/20 Split, $495 Flat Fee, Traditional
What agents and admins see when picking a plan.
Value
80/20, 100% commission, 90% / 10%
The number. Stamped onto e-sign documents.
External ID optional
495-100
Your back-office identifier. When an agent is created in Yrney we can send this downstream to provision their account in systems like Profit Power, which identify plans by code.
Where plans show up later
Creating a person — pick their plan, and add commission notes for anything negotiated on top of the standard plan. Notes are visible to brokers and admins only, never to the agent.
E-sign documents — plan label and value are available as data points when you map fields, so an ICA can carry the plan without anyone retyping it.
Downstream — the external ID travels with the agent record.
If you're not sure of the external ID yet, create the plan without it. You can add it later, and it only matters when a back-office integration is switched on.
Still stuck? Contact your brokerage's Yrney admin, or email support@yrney.com.
Company · 5 min read
Organization: regions, offices, and teams
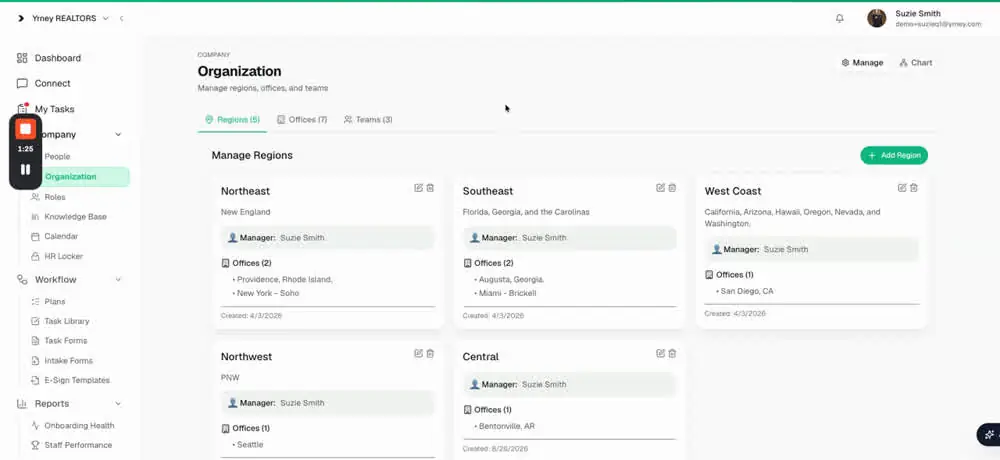
Company → Organization. Build this before you add people.
Organization is your brokerage's shape. Everything downstream — who sees which events, which admin gets which task, what an office code stamps onto a document — reads from here. Build it top down: regions → offices → teams.
Company → Organization: regions, offices, and teams.
Regions
A region groups offices — Northeast, Southeast, West Coast, however you actually talk about your footprint. Give it a name, a short description, and assign a region manager. Region managers matter for roles: a role holder can be scoped to a region, meaning they cover every office in it.
Offices
Field
Notes
Name
What agents will recognize — "New York – Soho", not "NY02".
Office code
For back-office integrations, and available as a stamped field on documents. Put it in even if you're not integrated yet.
Address
Don't skip this. It stamps onto paperwork and drives office-specific events.
Phone number
The office line agents and clients use.
Teams
Teams are the group an agent works inside. Give the team a name and description, assign a team admin, and say whether it's a single-office team or one that operates across multiple offices — plenty of teams do.
Guided setup already asked you some of this. New brokerages are walked through regions, offices, and teams at first sign-in. Come back here to add, edit, or restructure — the Chart view is the fastest way to see whether your structure matches reality.
Still stuck? Contact your brokerage's Yrney admin, or email support@yrney.com.
Company · 6 min read
People: your roster, and how to add a new agent
Company → People. Filter, find, and create users.
People is everyone in the company. Search by name, email or specialty, and filter by region, office, team, or role — the role filter is the quick way to answer questions like "who are my admins in the Southeast?"
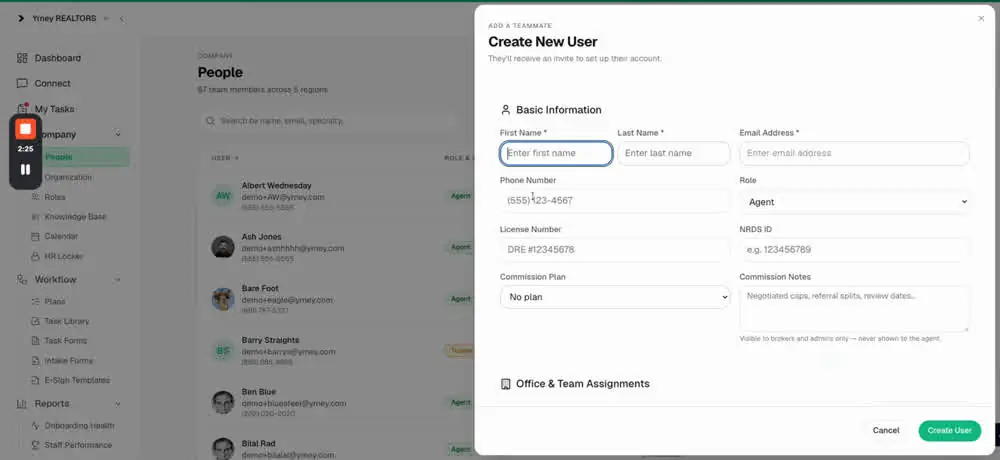
Create New User. Commission notes are visible to brokers and admins only.
Adding a new user
Click Create New User. They'll get an invite to set up their account, and the agent gets a welcome text message.
Basic information
Field
Notes
First / last name
Required.
Email address
Required. Use their personal email — many agents won't have a company address, and this is how they get in.
Phone number
How the welcome text reaches them.
Role
Agent, one of the other built-in roles, or a custom role you created.
License number
Stamps onto documents.
NRDS ID
Their REALTOR® ID.
Commission plan
Pick from the plans you set up in Settings.
Commission notes
Negotiated caps, referral splits, review dates — anything on top of the standard plan that has to travel downstream. Visible to brokers and admins only, never shown to the agent.
Office and team assignments
Choose their region, their office, and their team if they're on one.
Onboarding
Two decisions that shape their whole first week:
Which onboarding plan — typically a "new agent" plan and an "experienced agent" plan, because a 12-year veteran doesn't need the same 40 tasks a first-year licensee does.
Which intake form — the questions they answer at first sign-in.
You can also skip onboarding entirely. Use that for a veteran agent who just needs access, or for a staff member who isn't going through an agent plan.
Everything you type here saves the agent typing later. Anything entered when you create the person pre-fills their intake and stamps onto their documents. There is no double entry in Yrney — but only if the record starts complete.
Still stuck? Contact your brokerage's Yrney admin, or email support@yrney.com.
Company · 5 min read
Roles: how tasks find the right person
Company → Roles. The single most important setting for onboarding that actually finishes.
Roles do two jobs in Yrney: they say what someone is, and — more importantly — they decide where tasks land. When a task is assigned to "HR" or "Commissions", Yrney needs to know who that is for this particular agent, in this particular office.
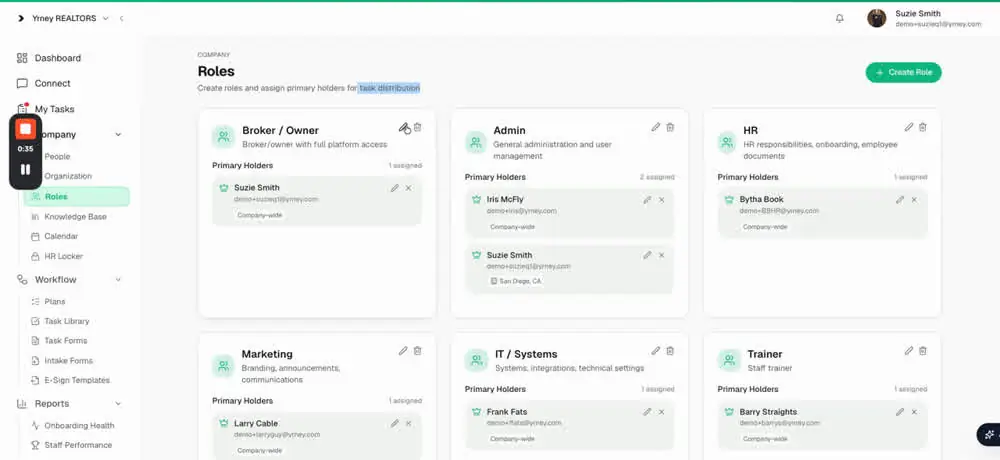
Roles with their primary holders and scope.
Built-in roles
Broker/Owner (full platform access), Admin, HR, Marketing, IT / Systems, Trainer, and more. Each has a short description so it's obvious what belongs to it.
Custom roles
Click Create Role for anything your brokerage has that we don't ship — Recruiter, Transaction Coordinator, Relocation Director. Custom roles behave exactly like built-in ones: they can hold tasks and be assigned to people.
Primary holders and scope
This is the part to get right. Every role should have at least one primary holder — the person who receives tasks for that role. You can assign more than one primary holder, and each holder has a scope:
Scope
Means
Typical for
Company-wide
They hold this role for every agent in the brokerage.
HR, Marketing, IT, Broker/Owner
Region
They cover every office in that region.
A managing broker over three offices
Office
They cover one office only.
Office admins
A single role can mix scopes: one company-wide admin plus a specific admin for San Diego is a completely normal setup.
The failure mode to avoid. A role with no primary holder means the tasks assigned to it have nowhere to go, and onboarding stalls without anyone noticing. Before you launch, walk the roles list and confirm every role that appears in your task library has a holder for every office.
Still stuck? Contact your brokerage's Yrney admin, or email support@yrney.com.
Company · 2 min read
Knowledge Base: your documents, searchable by AI
Company → Knowledge Base. Upload once, answer questions forever.
The Knowledge Base holds your company documents, policies, and training materials. Upload with Upload Doc, tag it (Procedures, Policies, Training), and it's available to the people who need it.
What to put in here
Policy manuals
Brand guidelines
Training manuals and handbooks
Links to training videos
Why it's worth doing early
Our AI can search the knowledge base. That means an agent asking "what's our policy on yard signs?" at 9pm gets an answer instead of waiting for Monday — and your admins stop answering the same eleven questions every time someone new joins.
Start with the top five. Policy manual, commission overview, brand guidelines, listing checklist, and your tech stack cheat sheet cover most of what new agents ask.
Still stuck? Contact your brokerage's Yrney admin, or email support@yrney.com.
Company · 6 min read
The company calendar and creating events
Company → Calendar. Rich events, RSVPs, and who gets to see them.
A brokerage-wide calendar that works for agents who don't have a company email address is something most brokerages have never had. This is that. Events can be company-wide or office-specific, and views include agenda, week, and month.
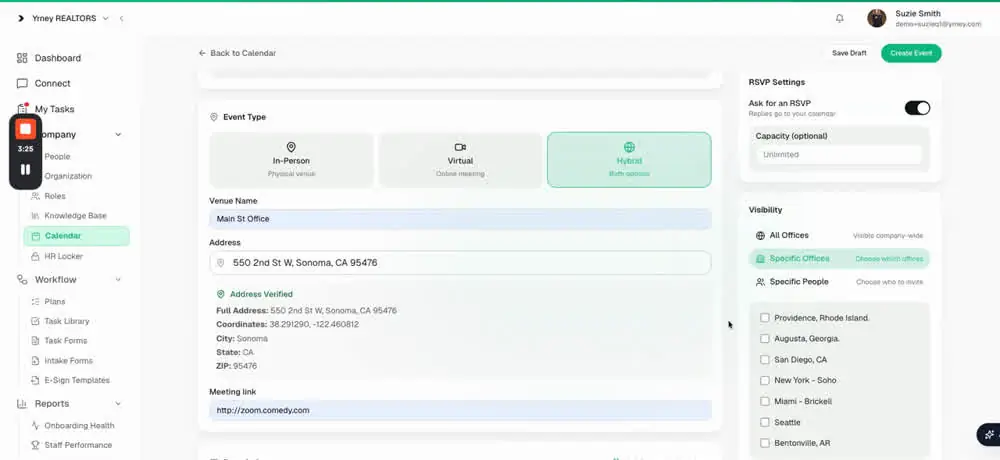
Creating an event: type, venue, RSVP settings, and visibility.
Creating an event
Section
What to fill in
Cover image
A real image at the top of the event. Use one — it's the difference between an invitation and a calendar entry.
Title
Plain and specific: "New agent orientation — Soho".
Date and time
All-day or specific times, and whether it repeats.
Event type
In-person, virtual, or hybrid.
Venue and address
For in-person and hybrid. Addresses are verified as you type.
Meeting link
Zoom, Meet, Teams — for virtual and hybrid.
Description
Scout can write a good first draft; edit it to sound like you.
Attachments
Slides, handouts, resources for attendees.
Category
From your event categories. Drives color and grouping.
Tags
Free-form. Tags are what you filter the calendar by later, so be consistent.
RSVP settings
Turn Ask for an RSVP on when you need a headcount, and set a capacity if the room has one. Replies go to your calendar.
Visibility — who sees this
All offices — visible company-wide.
Specific offices — choose which.
Specific people — a private event for a handful of invitees.
Announcing it
An event nobody hears about doesn't exist. From the event you can announce through Broadcast, which pushes it to Connect, email, and text. You can also create a calendar event directly from the Broadcast composer — same result, whichever way you start.
Still stuck? Contact your brokerage's Yrney admin, or email support@yrney.com.
Company · 6 min read
Broadcast: reach every agent, on the channel they actually use
One post. Connect, email, and SMS. Company-wide or one office.
Brokerages have asked the same question for years: how do I communicate with all my agents, easily? Facebook groups are a thing of the past. Agents have their own text chains you're not part of, and half a dozen other layers you don't know about. Broadcast lets a broker at a company of five thousand people reach everybody at once, across multiple mediums.
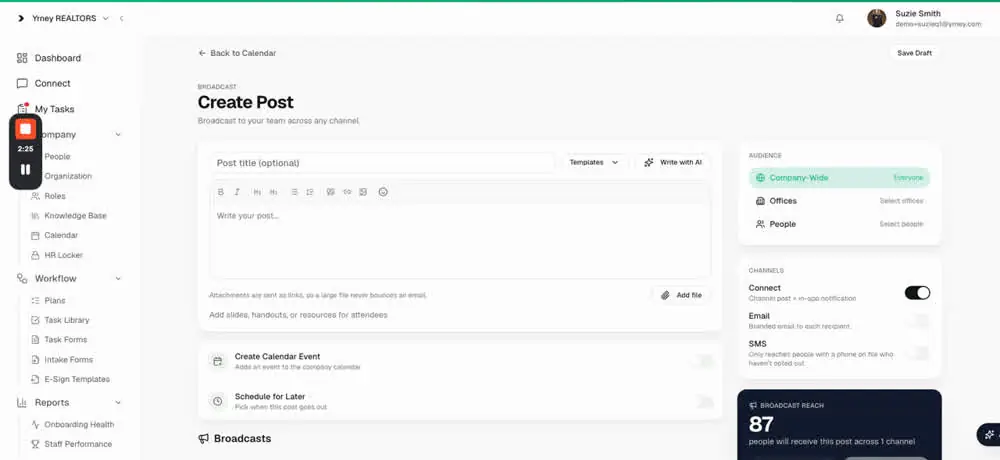
Broadcast: audience, channels, and the reach counter.
The goal is simple: meet agents where they are.
Writing the post
Optional title, then rich text — headings, lists, quotes, links, images, emoji.
Templates for the posts you send over and over.
Write with AI for a first draft you then edit.
Add file for slides or handouts. Attachments are sent as links, so a large file never bounces an email.
Two switches worth knowing
Create calendar event — adds the event to the company calendar as part of the same post, so the announcement and the invite are never out of sync.
Schedule for later — pick when it goes out.
Audience — the powerful part
Audience
Use for
Company-wide
Everyone. Policy changes, all-hands, launches.
Offices
One or several offices. Local events, office-specific operations.
People
Named individuals. A cohort, a team, the new hires this month.
Channels — how many layers it hits
Channel
Behavior
Connect
Channel post plus in-app notification. Lands in the platform agents already work in.
Email
A branded email to each recipient. For the agents who live in their inbox.
SMS
Only reaches people with a phone on file who haven't opted out. For the agents who live on their phone.
The composer shows you broadcast reach before you send — how many people will receive the post across the channels you picked. Check it. It's the fastest way to catch an audience you scoped too narrowly.
House rule. Use all three channels for things that block someone's business, Connect only for culture and chatter. Agents tune out an SMS that didn't need to be an SMS.
Still stuck? Contact your brokerage's Yrney admin, or email support@yrney.com.
Company · 3 min read
HR Locker: secure access to employee documents
Company → HR Locker. Everything signed or uploaded, in one place, visible only to the right people.
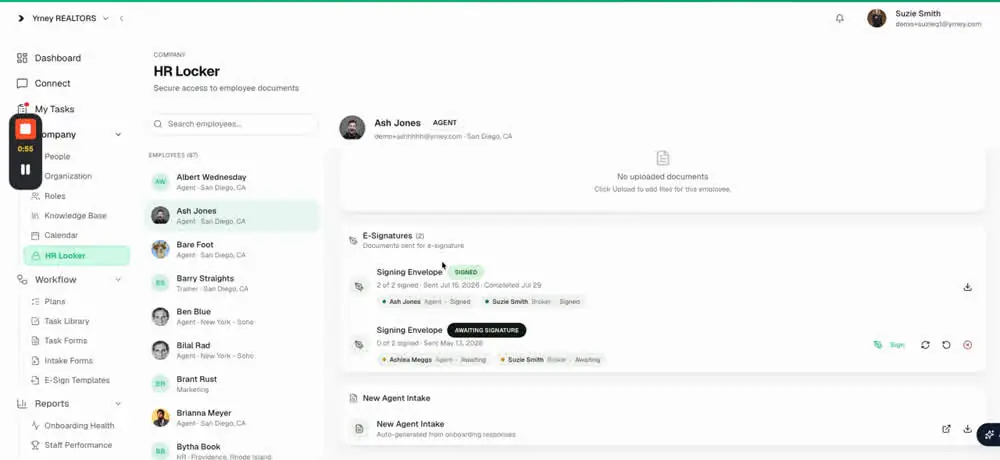
The HR Locker holds employee documents, per person, behind permissions. Only staff members and leadership who are allowed to see them will see them — and the scope follows the same rules as roles, so a manager can only access the HR Locker for their own office.
An employee's locker — signed envelopes and intake, filed automatically.
What lands in here automatically
Anything signed through Yrney — independent contractor agreements, continuing education and renewal paperwork, policy attestations.
Anything uploaded through a task — a voided check, a professional headshot, a copy of a driver's license.
Anything uploaded manually by an admin.
Finding things
Search the employee list, select a person, and you'll see their documents. That's the whole workflow — no folder structure to maintain, because documents file themselves when the task or the signature completes.
This is why task uploads matter. Every document you collect through a task instead of over email ends up in the locker automatically, attached to the right person, without an admin moving a file.
Still stuck? Contact your brokerage's Yrney admin, or email support@yrney.com.
Workflow · 6 min read
Intake forms: the agent's first five minutes
Workflow → Intake Forms. One form per agent type, no double data entry.
Intake is what shows up at the very beginning of the process, when an agent signs in for the first time. Get it right and everything downstream fills itself in.
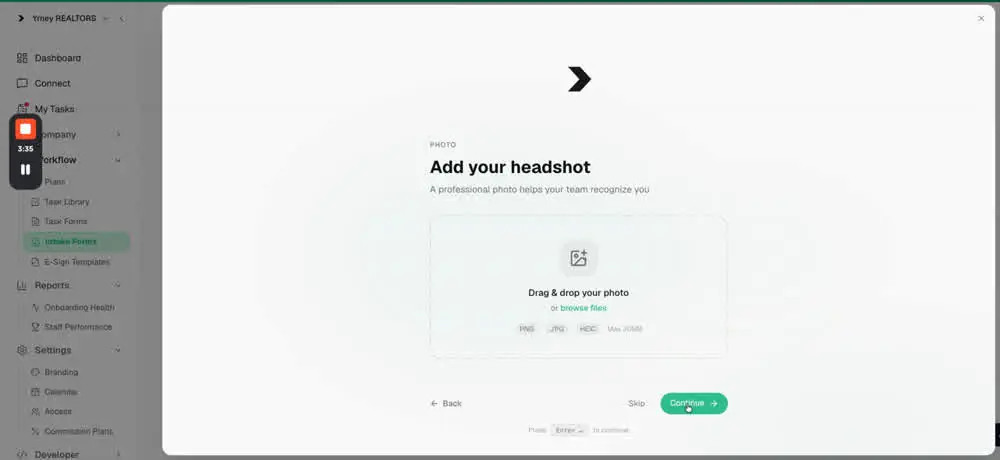
Part of the agent's intake experience: adding a headshot.
If you went through guided setup you already have a sample intake form. Use Create Form for more, Import Template to start from one, and Preview to see exactly what the agent sees.
What the agent experiences
They confirm their information. Anything you already entered is pre-filled — there is no double data entry, ever.
They answer your questions. Everything is encrypted where it needs to be.
They can enter direct deposit information, if you've turned that on for this form.
They add a headshot, which becomes their profile photo and avatar.
They secure their account — and get some confetti, because finishing should feel like finishing.
Direct deposit
Each form shows a Direct Deposit On/Off badge. When it's on, direct deposit details captured during intake automatically land on the direct deposit forms the agent has to sign — so they never rekey their banking information later. That's a small thing that removes a real point of friction and error.
Which forms to build
Form
For
New agent intake
Newly licensed agents. The full set — roughly 12–13 questions, ~18 minutes.
Experienced agent intake
Agents joining from another brokerage. Shorter; they've done this before.
Staff intake
Non-agent hires who need a different set of questions entirely.
Short / veteran intake
A veteran who doesn't need onboarding but is being introduced to the system. Two minutes, not eighteen.
Each form card shows how many questions it has, how many people have completed it, and its estimated completion time — a useful gut check that you haven't built something nobody will finish.
Intake forms are not task forms. Intake runs once, at the start, and feeds the agent's record. Task forms are reusable forms embedded inside individual tasks. Different tools, different jobs.
Still stuck? Contact your brokerage's Yrney admin, or email support@yrney.com.
Workflow · 5 min read
The task library: the engine behind onboarding
Workflow → Task Library. Build once, by role, and reuse forever.
The task library is every task that can happen during onboarding. It's the most powerful part of the platform, and the part worth spending real time on: get this dialed in and the rest of the engine just runs.
Each task is created for a role — agent, admin, broker, marketing, IT, HR — and Yrney routes it to whoever holds that role for that agent's office. Change the office admin next year and the tasks follow automatically, because you never hard-coded a name.
Browsing the library
Search by name, filter by role or category. Task names should read like instructions — "Countersign onboarding paperwork", "Set up SkySlope account", "Marketing packet review with agent" — so anyone can scan the list and know what happens.
Anatomy of a task
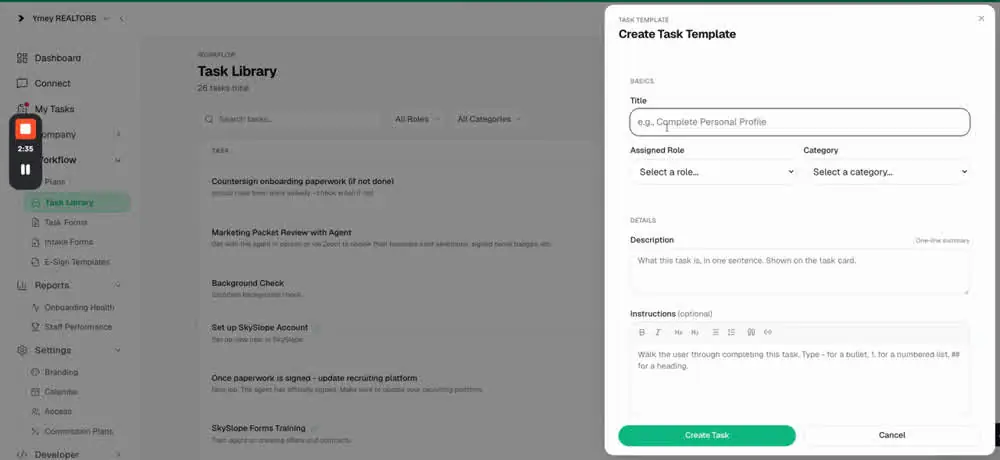
Every task has a title, an assigned role, a category, a one-sentence description, and optional step-by-step instructions. Then come the four pieces that make it powerful — each has its own guide:
Write the description like a person. One sentence on what to do, and instructions only if the steps aren't obvious. Nobody reads a wall of text on their first day.
Still stuck? Contact your brokerage's Yrney admin, or email support@yrney.com.
Task builder · 3 min read
Task resources: give people everything they need, in the task
Links, videos, images, and files — so nobody goes hunting.
Resources embed videos, images, files, or links inside the task, so whoever does it has everything in one place. Add as many as the task needs.
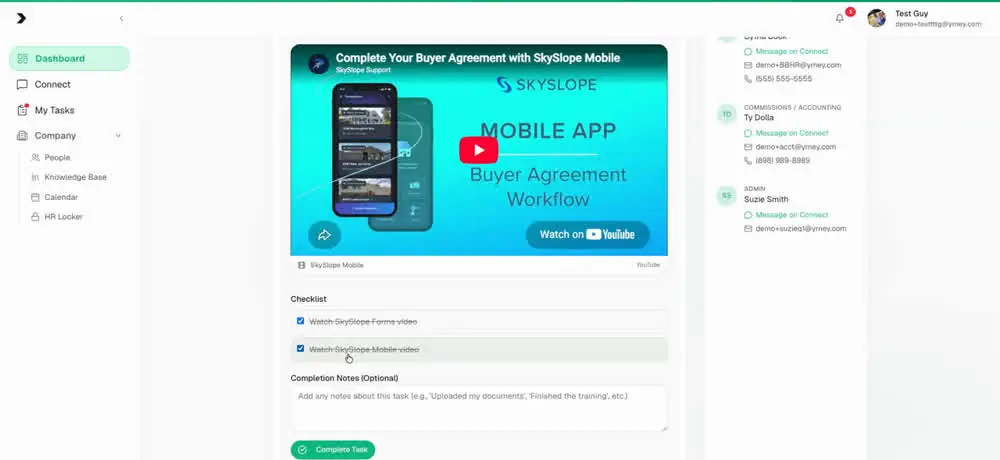
How resources look to the agent: an embedded video plus a checklist.
Type
Behavior
Use for
Link
Opens in a third-party tab. Give it a title, like "New hire handbook".
External sites, association portals, vendor logins.
Video
Paste a YouTube, Vimeo, or Loom URL. It plays inside the task — they click play and watch without leaving.
Walkthroughs, tool training, a welcome from the managing broker.
Image
Displays in the task.
Examples, screenshots, "this is what a correct sign rider looks like".
File
Upload or embed a document for them to read.
Reference PDFs, checklists, price sheets.
Video is the underused one. A 90-second screen recording attached to "Set up your MLS access" removes more support tickets than a page of written instructions ever will — and you record it once.
Still stuck? Contact your brokerage's Yrney admin, or email support@yrney.com.
Task builder · 3 min read
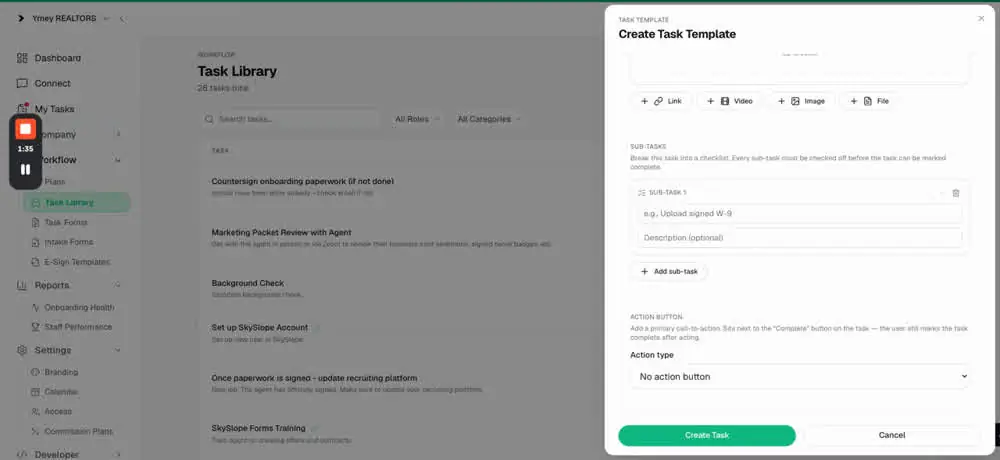
Sub-tasks: turn one task into a checklist
Every sub-task must be checked off before the task can be marked complete.
Sub-tasks break a task into a checklist. They're the right tool when one instruction actually means several small actions that all have to happen.
Resources and sub-tasks inside the task builder.
The classic example
Task: Log into your company systems.
Sub-task: Log into your transaction management system
Sub-task: Log into your CRM
Sub-task: Log into your CMA tool
Three real actions, one line on the agent's task list. Without sub-tasks you either get three separate tasks cluttering their day, or one vague task they check off having done a third of it.
How they behave
Each sub-task has a title and an optional description.
Reorder them — the order is the order they'll be done in.
Every sub-task must be checked before the task as a whole can be marked complete. That's the enforcement that makes them worth using.
Rule of thumb. If the steps must all happen for the task to be true, use sub-tasks. If they're independent pieces of work, or land on different roles, make them separate tasks.
Still stuck? Contact your brokerage's Yrney admin, or email support@yrney.com.
Task builder · 5 min read
Action buttons: do the thing without leaving the task
External link, embedded page, or sign documents. The favorite feature of the tasking system.
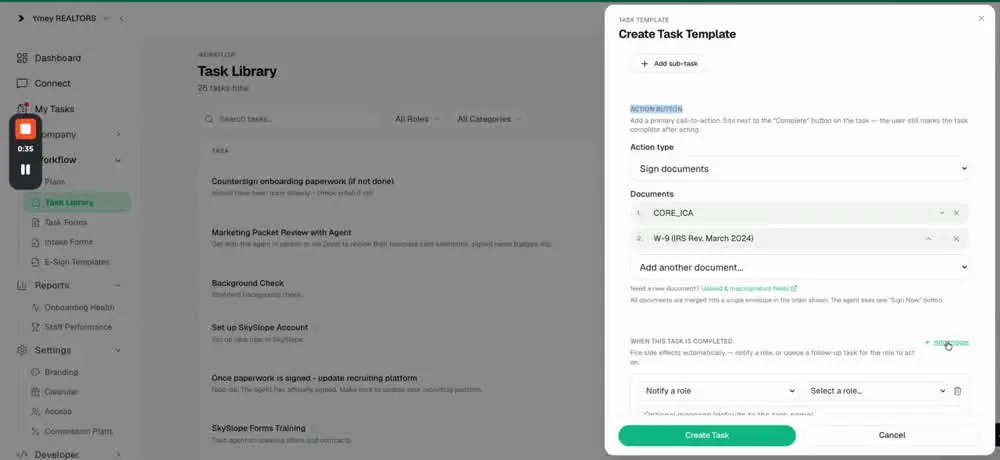
An action button is a primary call-to-action that sits next to the Complete button on a task. The user still marks the task complete after acting — the button just means they don't have to go find the thing they're supposed to do.
A "Sign documents" action button with its envelope, plus a trigger.
Action types
Type
What happens
External link
Opens in a new tab.
Embedded page
Opens inline, inside Yrney — the agent never leaves the flow.
Sign documents
Opens an embedded signing experience with the documents you attached.
Embedded vs external. Some third-party links behave better embedded, others insist on their own tab. Test yours both ways before you roll the task out to a hundred agents — our team will help you sort out the awkward ones.
Sign documents
This is the one that changes onboarding. Pick the documents that need signing — your ICA, W-9, direct deposit form, policy attestation — in the order you want them shown. All documents are merged into a single envelope, and the agent sees one Sign Now button.
Documents come from your e-sign templates. Need a new one? Upload and map signature fields, and our team will help you set it up.
Reorder documents in the envelope with the arrows.
Because fields are mapped to data already in Yrney, most of the paperwork arrives pre-filled.
No more chasing paper files around for onboarding paperwork. The agent signs in the same place they're doing everything else, and the signed documents file themselves into the HR Locker.
Pair it with a trigger. "Sign documents" plus a task trigger that notifies commissions and the broker is the single highest-value thing you can build in Yrney.
Still stuck? Contact your brokerage's Yrney admin, or email support@yrney.com.
Task builder · 5 min read
Task triggers: what happens automatically when a task is done
Notify a role, or queue the next task for the role that has to act.
Triggers fire side effects automatically when a task is completed. They're what turn a checklist into an engine: the work moves to the next desk without anyone remembering to hand it off.
In the task builder, under When this task is completed, click Add trigger. A task can have several.
Notify a role
Tell a role that something happened. Classic uses, all off the back of "documents signed":
Notify Commissions — paperwork is signed, go assign the commission plan.
Notify Marketing — kick off the marketing workflow: headshot, bio, announcement, business cards.
Notify the Broker — countersign these documents.
Create a task for a role
Pick a role and a task template, and when this task completes, that task is automatically created and assigned to whoever holds that role for this agent's office. This is how you chain a process across departments without a project manager in the middle.
A worked example
Agent completes Sign onboarding paperwork
↓
Trigger: notify Commissions · Trigger: create Countersign paperwork for Broker
↓
Broker countersigns → trigger creates Order business cards for Marketing
↓
Signed documents land in the HR Locker automatically
Check your role holders first. A trigger that creates a task for a role with no primary holder in that office has nowhere to send the work. Walk your roles before you launch.
Still stuck? Contact your brokerage's Yrney admin, or email support@yrney.com.
Workflow · 5 min read
Task forms: collect information inside a task
Workflow → Task Forms. Reusable forms, embeddable in tasks, mappable to documents.
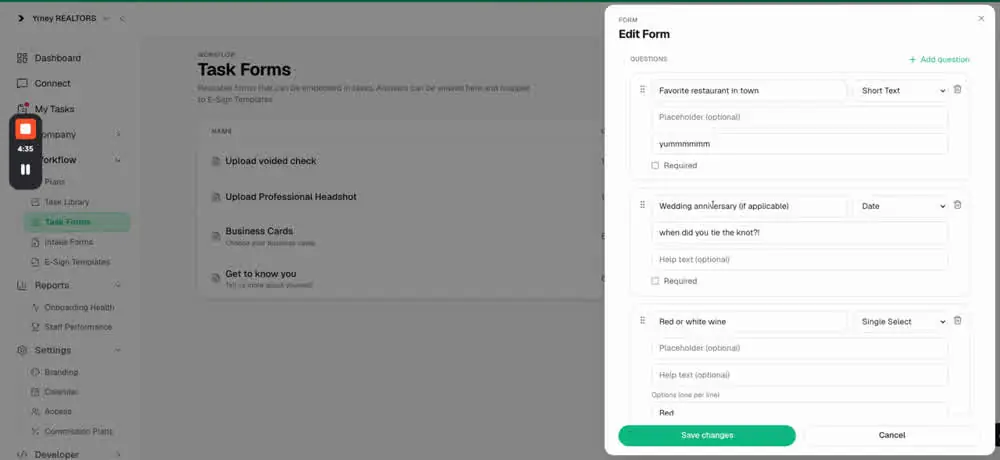
Task forms are like a Google form or a web form, built into onboarding. They're reusable — build one, embed it in as many tasks as you like — and the answers can be viewed here or mapped onto e-sign templates.
Editing a task form. Each question has a type and a Required toggle.
Each question has a label, a type (short text, upload, choice, and more), optional placeholder and help text, and a Required toggle. Drag to reorder.
Three kinds worth building
1. Get-to-know-you forms
The fun ones: favorite restaurant, favorite sports team, favorite vacation spot, wedding anniversary. This is culture-building and marketing fuel — and it's not trapped in Yrney. Form answers can be sent by webhook wherever they need to go, so an external gifting tool can know it's someone's anniversary and that they like red wine, and put a bottle on the way without anyone remembering.
2. Upload forms
"Upload your professional headshot" — which may be a different photo from their profile picture, because this one goes in marketing and company materials. "Upload a voided check." Anything uploaded into a task automatically lands in the HR Locker, attached to that person.
3. Ordering forms
A custom business card ordering form with rich image options showing each design, plus the fields that go on the card. When the task completes, a trigger notifies marketing that the business card information is in, and they place the order.
Task forms vs intake forms. Intake runs once at the very start and builds the agent's record. Task forms are reusable pieces embedded in individual tasks, any time during onboarding.
Still stuck? Contact your brokerage's Yrney admin, or email support@yrney.com.
Workflow · 7 min read
E-sign templates and field mapping
Workflow → E-Sign Templates. Upload a PDF, map the fields, and end double entry.
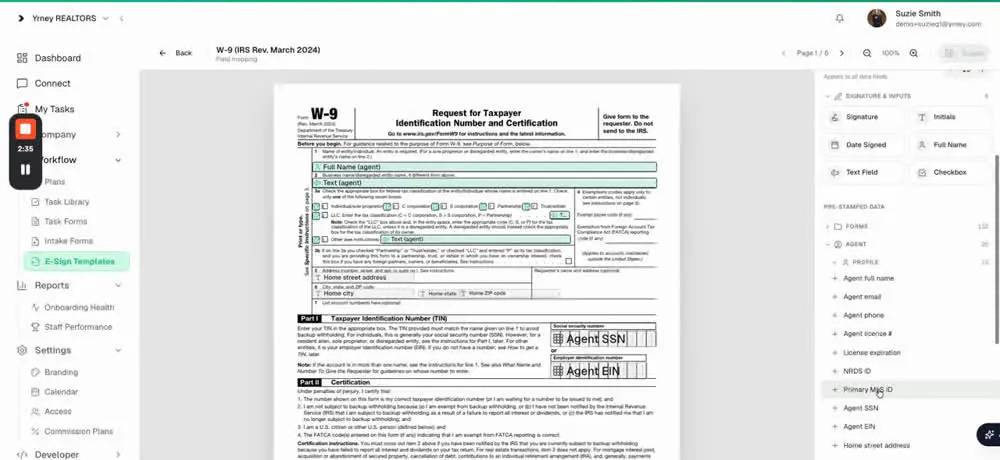
E-sign templates are your documents, set up once so they can be signed inside a task with most of the work already done. Yrney will help you templatize your documents, but the process is genuinely easy — and a W-9 is already set up for every user in Yrney out of the box.
Field mapping on the W-9, with pre-stamped agent data on the right.
What to upload
Independent contractor agreement
W-9 (already provided)
Direct deposit authorization
Policy manual attestation
Anything else an agent has to sign on day one
Mapping fields
Open a template and you're in the field mapping view: the PDF on the left, your field palette on the right. Click a field, then click the PDF to place it. Set recipients (who signs — agent, broker, and so on), the signing order (any order, or in order), and the data text size.
Signature and inputs
The fields you'd expect: Signature, Initials, Date Signed, Full Name, Text Field, Checkbox.
Pre-stamped data — the part that matters
Any data collected anywhere in Yrney can be stamped onto a form. There is no double entry, ever.
Source
Examples
Forms
Anything answered on an intake form or a task form.
Agent
Name, license number, NRDS ID, SSN, address, phone, email. We collect the sensitive items early and encrypted, so they stamp where they belong.
Commission plan
Plan label and value.
Banking
Direct deposit details captured at intake, straight onto the direct deposit form.
Organization
Brokerage name and EIN; office name, code, and full address; broker name (BIC) and broker license number.
The promise to hold onto. It doesn't matter whether something was entered when the agent was created, on an intake form, or on a task form — we capture it once and use it everywhere. Double entry is a thing of the past.
How signed documents reach people
Attach templates to a task with a Sign documents action button. Documents merge into one envelope, the agent signs once, and completed documents land in the HR Locker. Add a trigger so commissions, marketing, and the broker find out the moment it's done.
Still stuck? Contact your brokerage's Yrney admin, or email support@yrney.com.
Tracking · 4 min read
My Tasks: see where every agent actually is
Full visibility into onboarding, for every person going through it.
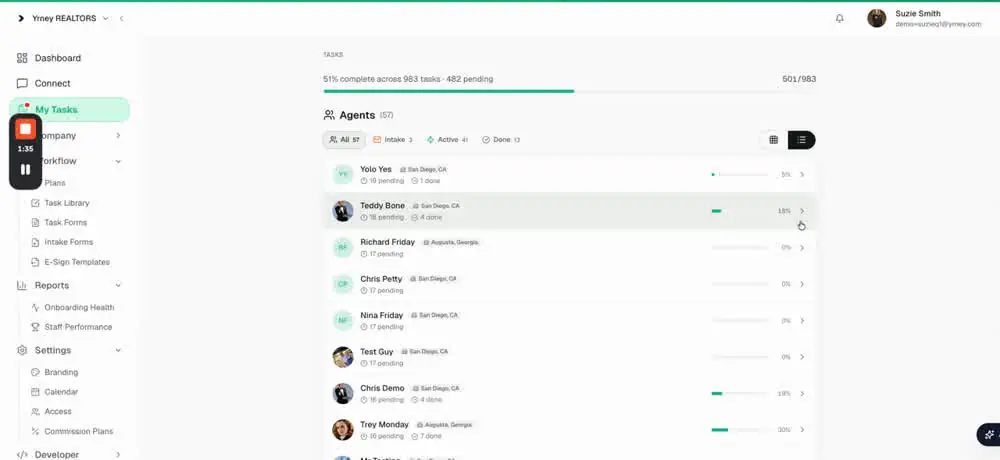
When you add a new agent and tasks get divvied up, the agent gets their own experience. As a broker, owner, or admin, My Tasks is where you watch the whole thing.
My Tasks: completion across every agent in onboarding.
What you see
Overall completion across every task in flight — "51% complete across 983 tasks · 482 pending".
Every agent, with pending and done counts and a progress bar.
Filters for Intake, Active, and Done, plus grid or list view.
Opening an agent
Click into a person and you'll see the phases they're in and what's left in each — and, critically, whose tasks they are. An agent with ten open tasks might be waiting on HR for one, commissions for another, and admin for a third. There are a lot of cooks in the kitchen during onboarding; this is the view that shows you which one is holding things up.
Use it as a standing agenda. Two minutes in this screen before your weekly staff meeting tells you exactly which department to ask about, and which new agent is about to have a bad first week.
Still stuck? Contact your brokerage's Yrney admin, or email support@yrney.com.
Tracking · 4 min read
Connect: Slack for real estate
Channels, direct messages, and where your broadcasts land.
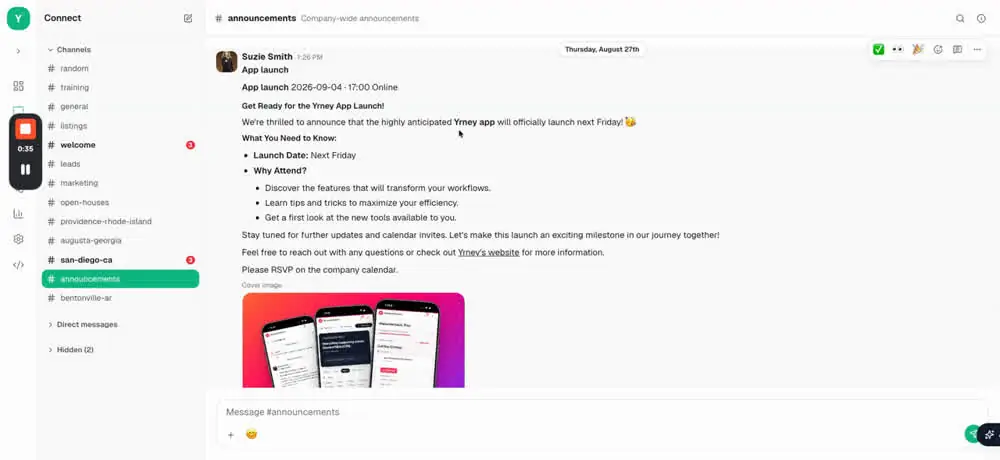
Connect is the communication layer inside Yrney — a real chat product built for the way a brokerage is actually organized. Nothing like it has existed at the brokerage level before.
A channel for every office location — san-diego-ca, providence-rhode-island, augusta-georgia — so local conversation stays local.
Company-wide channels like #announcements and #welcome.
Where broadcasts land
When you send a broadcast to an office or the company, the announcement posts here and hits the agent on their mobile device — or in the platform if they're signed in. Event announcements arrive with their cover image and an RSVP pointer, so the announcement and the calendar are one thing.
Direct messages
Agents can DM each other. Staff can DM each other. The whole brokerage operates inside one platform, tied to their people — instead of scattered across text chains and social groups you're not part of.
Where Connect fits. Yrney at its core is onboarding, operations, communications, and the agent experience. Connect is the piece that keeps everyone in the same room after onboarding ends.
Still stuck? Contact your brokerage's Yrney admin, or email support@yrney.com.
Workflow · 7 min read
Plans: assembling tasks into an onboarding workflow
Workflow → Plans. Phases, ordered tasks, and dependencies on a Kanban board.
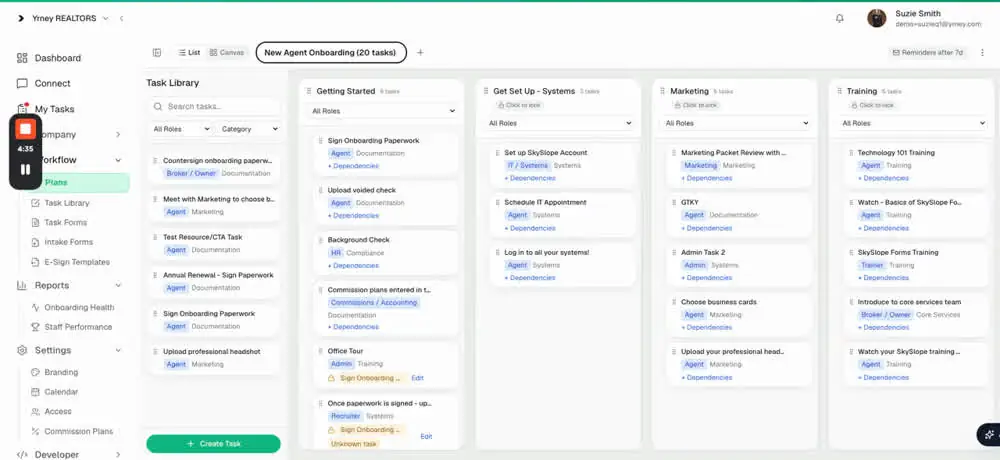
Plans are the last thing you build, and the piece that ties everything together. Once you've built out tasks, e-sign templates, forms, and your intake form, you can assemble them into a plan on a classic Kanban board.
A plan on the Kanban board: phases, ordered tasks, dependencies.
Which plans to build
Plan
Why
New agent onboarding
The full workflow for a newly licensed agent.
Experienced agent onboarding
Shorter — they've done this before.
Continuing education
Recurring compliance work with a defined set of steps.
Offboarding
The exit checklist nobody ever writes down.
Challenges and programs
Sales challenges, mentorship tracks, anything with a sequence.
Anything that has a set of tasks or actions that need to be done can have its own plan.
The structure
Plan — "New Agent Onboarding (20 tasks)"
↓
Phases — Getting Started · Get Set Up – Systems · Marketing · Training · Launch
↓
Tasks — pulled from your task library, each carrying its role and category
↓
Dependencies — this task unlocks that one
Building it
The Task Library sits on the left. Search it, filter by role or category, and drag tasks into a phase.
Phases can be named whatever you want. The five above are a good starting shape.
Order matters — set tasks in the order you want them to show up in.
Each phase has an All Roles filter, so you can look at a phase through one role's eyes and see exactly what the agent, or IT, or marketing has to do in it.
Two views: List and Canvas. Once a plan gets large, canvas view is easier to reason about.
Dependencies
Click + Dependencies on a task to make it wait for another one. Example: you don't get a tour of the office until you've signed your onboarding paperwork.
Only tasks within the same phase can be prerequisites. There are no cross-phase dependencies. If two tasks need to be chained, put them in the same phase — or chain them with a task trigger instead, which works across the whole plan.
Reminders
Each plan has a reminder setting — "Reminders after 7d" in the sample — so stale tasks nudge themselves instead of you chasing.
Why this is worth the afternoon it takes. Every department gets what they need, when they need it, with no more chasing. Onboarding is the first thing an agent experiences at your brokerage, and you don't get a second chance at a first impression. Dial this in and the promise you made them — that you have your stuff together — is actually true.
Still stuck? Contact your brokerage's Yrney admin, or email support@yrney.com.
Tracking · 4 min read
The dashboard: what needs your attention today
Where a broker or admin lands. Attention items, momentum, and quick actions.
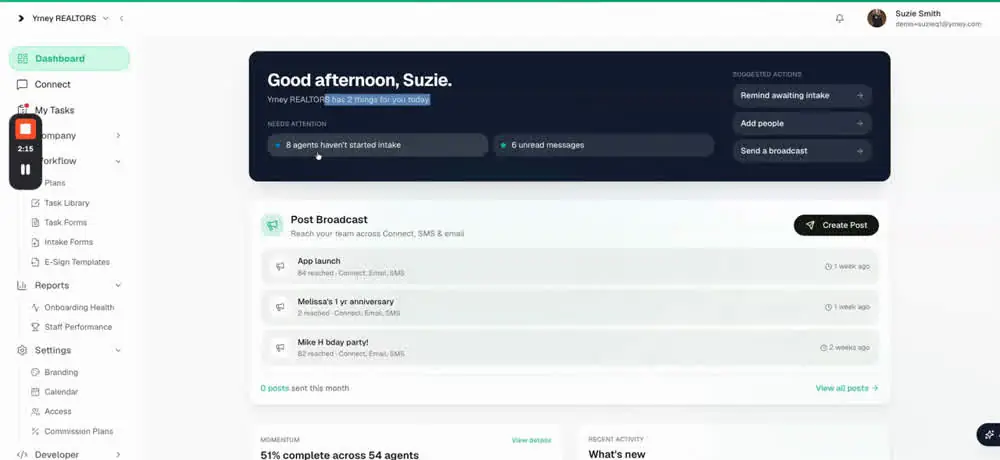
The dashboard is the first screen a broker or admin sees. It's built to answer one question — what needs me today — rather than to be a wall of charts.
The dashboard: needs attention, suggested actions, broadcasts.
Needs attention
Up top: a greeting and a count of the things waiting on you. Typically:
Agents haven't started intake — you invited them, but they haven't opened their onboarding email. These are the people about to slip.
One click each: Remind awaiting intake, Add people, Send a broadcast. The reminder is the one to build a habit around — a nudge on day two is worth more than a phone call on day ten.
Post Broadcast
Compose from the dashboard, and see your recent posts with their reach ("84 reached · Connect, Email, SMS") and how many you've sent this month. Full detail in the Broadcast guide.
Momentum and recent activity
Momentum — overall completion across every onboarding task in flight, e.g. "51% complete across 54 agents · 501 of 983 onboarding tasks complete". View details opens My Tasks.
What's new — new agents this week, unread messages by channel.
My Tasks — the tasks assigned to you, not your agents.
Upcoming events — next 14 days from the company calendar, with a Join button on virtual events.
A two-minute routine. Clear "haven't started intake" first, then unread messages, then glance at momentum. That order matches how onboarding actually fails: at the very beginning, quietly.
Still stuck? Contact your brokerage's Yrney admin, or email support@yrney.com.
Developer · 5 min read
The Developer section: connecting Yrney to your other systems
Developer → API Keys, Webhooks, Provisioning, SkySlope. Written for IT teams and the people who manage them.
Yrney is designed to be the people layer that feeds your other systems. The Developer section is where your IT team, CIO, or integration partner connects it up — so data you collect once in Yrney flows downstream automatically.
You don't have to be technical to understand what's here. In plain terms:
API Keys
Credentials that let another system talk to Yrney. Your IT team creates and stores these.
Yrney tells other systems when something happens — "this agent finished intake", "this task is complete" — the moment it happens, so nobody re-enters anything.
The point of all of it. Onboarding is where the information about a new agent first exists. Every other system in the brokerage needs some of it. Yrney's job is to hand that information over the moment it's complete and correct, instead of having four departments retype it.
Who should touch this section. IT or an integration partner. Everything else in Yrney is safe to explore; endpoints and provisioning rules affect live systems.
Still stuck? Contact your brokerage's Yrney admin, or email support@yrney.com.
Developer · 5 min read
Webhooks: telling your other systems what just happened
Developer → Webhooks. Real-time events when agents complete intake, tasks, and more.
A webhook is a URL you own. When something happens in Yrney, Yrney sends a message to that URL immediately. That's the whole idea — no polling, no exports, no one remembering to send a spreadsheet.
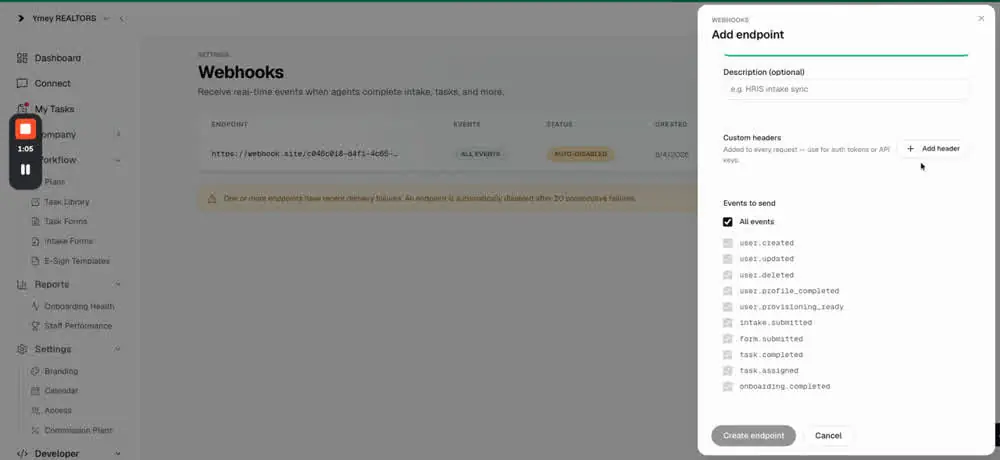
Adding a webhook endpoint and choosing events.
Adding an endpoint
Click Add endpoint and fill in:
Field
What it's for
Endpoint URL
The address your system listens on.
Description
Plain-English label, e.g. "HRIS intake sync". Do use it — future you will be grateful.
Custom headers
Added to every request. This is where auth tokens or API keys go.
Each endpoint row has Logs, Edit, Test, Enable/Disable, and delete. Use Test before you trust it, and Logs when something didn't arrive.
Endpoints auto-disable. After 20 consecutive delivery failures Yrney disables the endpoint and shows a warning banner. If a downstream sync has "gone quiet", check here first — it's usually a dead URL or an expired token, and you re-enable it once fixed.
Still stuck? Contact your brokerage's Yrney admin, or email support@yrney.com.
Developer · 5 min read
Provisioning requirements: when is an agent ready for an account
Developer → Provisioning. Define “ready”, and let Yrney announce it.
This page answers one question: what does a new agent have to finish before your connected systems are told they're ready? Everything you list counts, in any order.
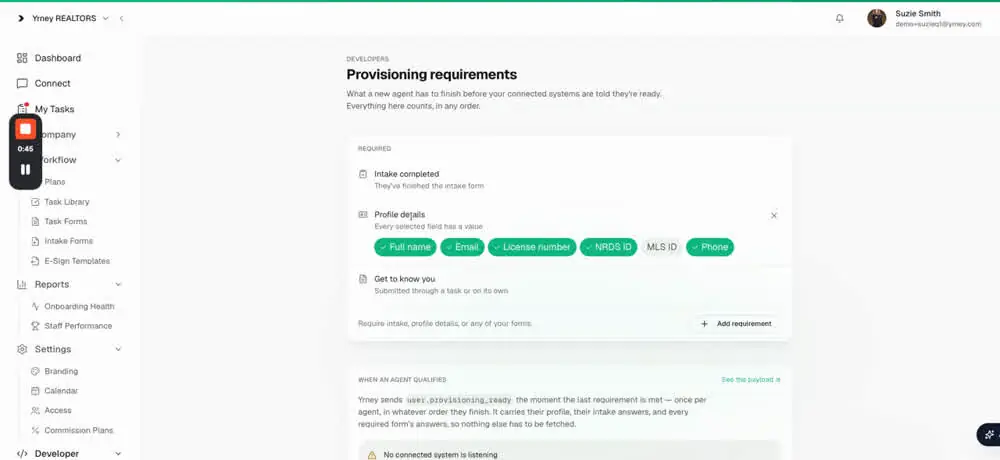
Provisioning requirements — intake, profile fields, and forms.
The requirement types
Requirement
Meaning
Intake completed
They've finished the intake form.
Profile details
Every field you select has a value — Full name, Email, License number, NRDS ID, MLS ID, Phone. Click a chip to require or drop it.
A submitted form
Any of your forms: Upload voided check, Upload Professional Headshot, Business Cards, Get to know you.
Use Add requirement to add more, then Save requirements.
What happens when they qualify
Yrney sends user.provisioning_ready the moment the last requirement is met — once per agent, in whatever order they finish. The event carries their profile, their intake answers, and every required form's answers, so the receiving system has nothing else to fetch.
"No connected system is listening." If you see this, the requirements are still being evaluated but the event has nowhere to go. Add a webhook endpoint subscribed to it.
The backlog counter
The page tells you how many existing agents already meet the requirements and have not been sent — "5 of 73 agents". Anyone who finishes from now on is sent automatically; the existing five are your catch-up batch.
Set the bar where your downstream systems actually need it. Requiring MLS ID when your back office doesn't use it just parks agents in limbo. Start with what's genuinely mandatory and add later.
Still stuck? Contact your brokerage's Yrney admin, or email support@yrney.com.
Integrations · 5 min read
The SkySlope integration
Developer → SkySlope. Roster sync and placing new agents in the right SkySlope office.
SkySlope has its own setup flow, because it's the system most brokerages are already running. Connected, it lets Yrney sync to your SkySlope roster and place newly onboarded agents into the correct SkySlope office.
Enter and save your SkySlope connection details. Save them here — read-only environment credentials work for reading the roster but have nowhere to store an office mapping.
2 · Roster sync
Yrney reads your existing SkySlope roster so the two systems agree on who exists.
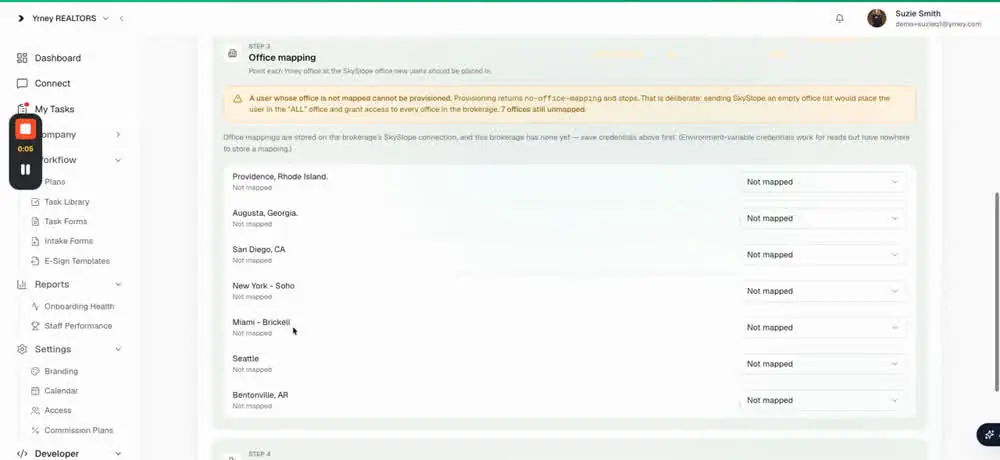
3 · Office mapping
Point each Yrney office at the SkySlope office new users should be placed in. Every office in your organization is listed with a dropdown.
4 · Go live
Once mapped, agents who reach provisioning ready can be placed automatically.
Unmapped offices are blocked on purpose. A user whose office isn't mapped can't be provisioned — provisioning returns no-office-mapping and stops. That's deliberate: sending SkySlope an empty office list would place the user in the "ALL" office and grant them access to every office in the brokerage. Map every office before you switch this on.
Do this with IT in the room. Office mapping is a one-time job that's easy to get subtly wrong, and wrong here means an agent seeing transactions from offices they shouldn't.
Still stuck? Contact your brokerage's Yrney admin, or email support@yrney.com.
Integrations · 3 min read
Integrations: how Yrney connects to the systems you already use
What connects today, how it's switched on, and who to talk to.
Onboarding is where the information about a new agent first exists. Integrations hand that information to the other systems in your brokerage, so nobody has to type it in a second time.
Yrney can also notify your other systems when something happens, like an agent finishing intake or becoming ready for an account. Your IT team or integration partner sets this up with webhooks and provisioning requirements.
Not sure what fits your setup? Email support@yrney.com and tell us which systems you run. We'll walk you through the options.
Still stuck? Contact your brokerage's Yrney admin, or email support@yrney.com.
Integrations · 1 min read
The Profit Power integration
Connecting Yrney to your Profit Power back office.
Yrney works with Profit Power, so the agent information you collect during onboarding can reach your back office without anyone typing it in again.
Setting it up? The Yrney team connects Profit Power with you. A step-by-step guide is coming soon. Until then, contact Yrney for more info at support@yrney.com.
Still stuck? Contact your brokerage's Yrney admin, or email support@yrney.com.
Agent basics · 4 min read
Welcome — your first 15 minutes in Yrney
What Yrney is, how you got here, and what to do first.
Your brokerage uses Yrney to get you set up: paperwork, systems, training, and everything else that has to happen before you can list and sell. Instead of a stack of emails from six different people, it's one guided list, in one place, that you work through at your own pace.
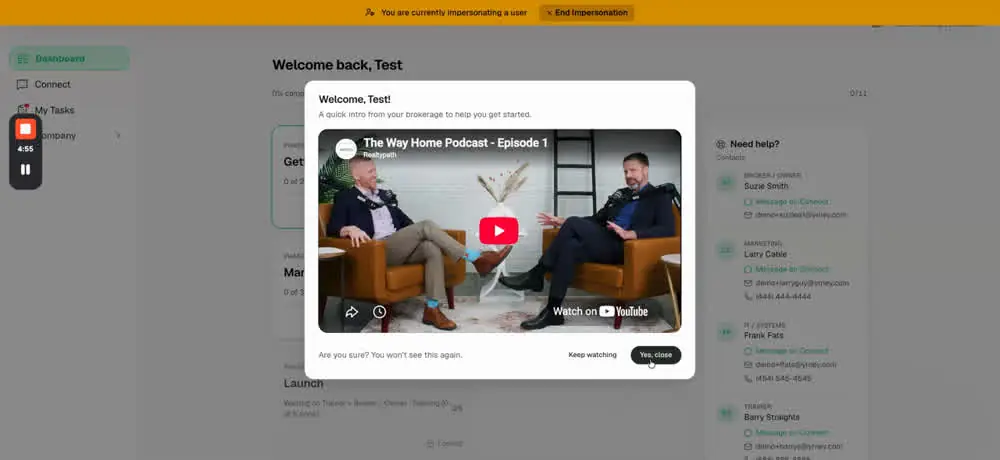
The welcome video from your brokerage, shown once on your first visit.
Getting in
You'll get an onboarding email from your brokerage. Open it and follow the link.
Complete your intake form — this is the one big block of questions, and it's the reason you'll never be asked for the same information twice.
Add a headshot. It becomes your profile photo across the platform.
Secure your account, and you're in.
Do intake in one sitting. It takes most people about 15–20 minutes, and until it's finished the rest of your onboarding can't be handed to you. It's the one thing that unblocks everything else.
What's in the intake form
Your details, your license information, and — if your brokerage has it turned on — your direct deposit information. Sensitive items are encrypted, and everything you enter flows automatically onto the forms you'll sign later, so you won't re-type your license number or your bank details ever again.
The welcome video
The first time you land on your dashboard you may see a short intro from your brokerage. It only shows once — if you want to watch it later, ask your admin for the link.
The Yrney mobile app is in private betaTasks, messages, and your calendar in your pocket — launching soon. Until then, Yrney works in your phone's browser.
Still stuck? Contact your brokerage's Yrney admin, or email support@yrney.com.
Agent basics · 4 min read
Your dashboard: the phases that guide you
Where you land, what the numbers mean, and who to ask for help.
Your dashboard is your onboarding, laid out as a guided path. You don't have to work out what's next — the dashboard tells you.
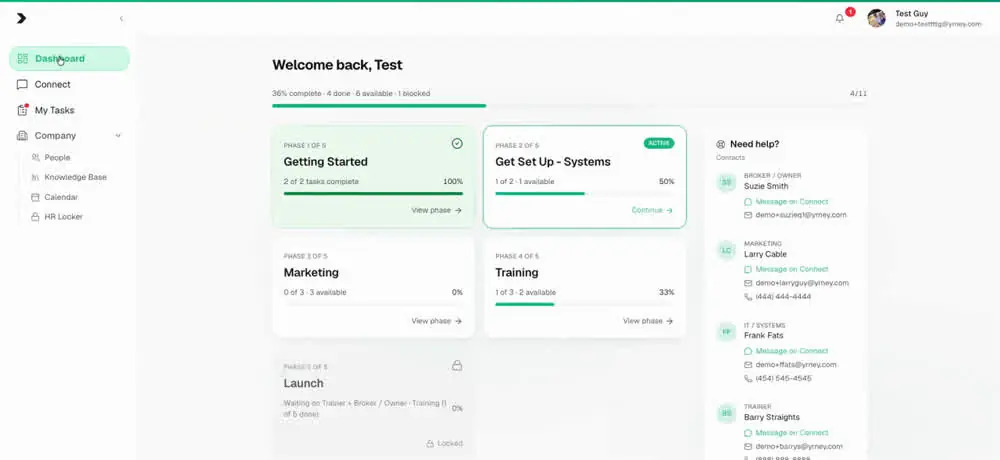
Your dashboard: progress, phase cards, and the Need help? contacts panel.
The progress line
Under the greeting you'll see something like "36% complete · 4 done · 6 available · 1 blocked". In plain English:
Word
Meaning
Done
You've completed it.
Available
Ready for you right now. This is your to-do list.
Blocked
Waiting on something else — usually another task, or a person at the brokerage.
The phase cards
Your onboarding is split into phases — typically Getting Started, Get Set Up – Systems, Marketing, Training, and Launch. Each card shows how far along you are, and the one you're working on is marked ACTIVE with a Continue button. Finished phases get a green check.
A phase with a lock on it isn't your fault: the card tells you what it's waiting for, e.g. "Waiting on Trainer + Broker / Owner". It opens as soon as those people finish their part.
Need help? — the contacts panel
Down the right-hand side is every person you might need, by role: broker/owner, admin, marketing, IT/systems, trainer, recruiter, HR, commissions. Each one has a Message on Connect link, an email address, and often a phone number.
Use it. If a task doesn't make sense, or a phase has been locked for days, message the role that owns it. That's exactly what the panel is there for — you're not bothering anyone.
The Yrney mobile app is in private betaTasks, messages, and your calendar in your pocket — launching soon. Until then, Yrney works in your phone's browser.
Still stuck? Contact your brokerage's Yrney admin, or email support@yrney.com.
Agent basics · 6 min read
Your tasks: how to work through and complete them
Resources, checklists, forms, signing — and the Complete Task button.
Open a phase from your dashboard, or go to My Tasks, and you'll see your tasks grouped into Available and Completed. Click one to expand it.
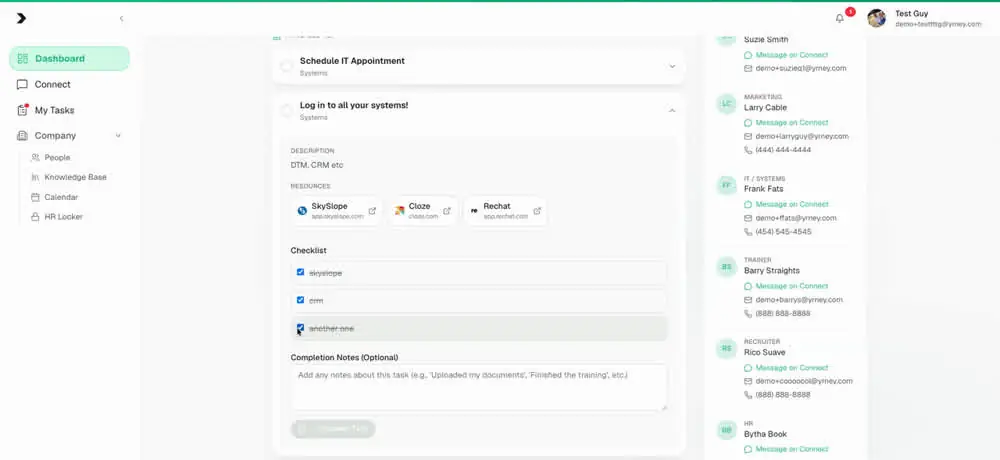
A task with resources, a checklist, and completion notes.
What's inside a task
Section
What to do with it
Description
What this task is, in a sentence. Read it first.
Resources
Links, files, and videos your brokerage attached — shown as buttons you click, or a video that plays right inside the task.
Checklist
Sub-steps. Check each one off; they strike through as you go. The Complete Task button stays greyed out until the whole checklist is done.
Completion notes
Optional. Useful for "uploaded my documents" or a note back to your admin.
Complete Task
Marks it done — and often kicks off someone else's job behind the scenes, so only press it when the work is actually finished.
Tasks that ask you to sign
Some tasks have a Sign Now button. Everything you need to sign is bundled into one envelope — contractor agreement, W-9, direct deposit, policy acknowledgements — and it opens inside Yrney (there's an "Open in new tab" option if you'd rather have a bigger window).
Most of the document arrives pre-filled from your intake answers.
For your signature you can Draw, Type, or Upload one. You'll confirm you consent to signing electronically.
Signed copies are filed automatically into your HR Locker — you don't have to save anything.
Tasks that ask you to upload or fill in a form
These open a panel on the right. Choose your file or answer the questions, then Submit & complete task — a form task marks itself complete when you submit it. Save draft keeps your answers if you need to come back.
The camera on your phone is the fastest scanner you own. Voided checks, licences, certificates — snap and upload them straight into the task from your phone.
If a task looks stuck
Blocked tasks are waiting on an earlier step or on another person — IT, marketing, your broker. Check the phase card on your dashboard for what it's waiting on, then message that role from the Need help? panel.
The Yrney mobile app is in private betaTasks, messages, and your calendar in your pocket — launching soon. Until then, Yrney works in your phone's browser.
Still stuck? Contact your brokerage's Yrney admin, or email support@yrney.com.
Agent basics · 2 min read
Signing in (and what to do if you can't)
Password, forgotten password, or a one-tap sign-in link.
Sign in with the email address your brokerage used to invite you and your password. If you're not sure which email that is, ask your office admin — it's usually your personal address, not a company one.
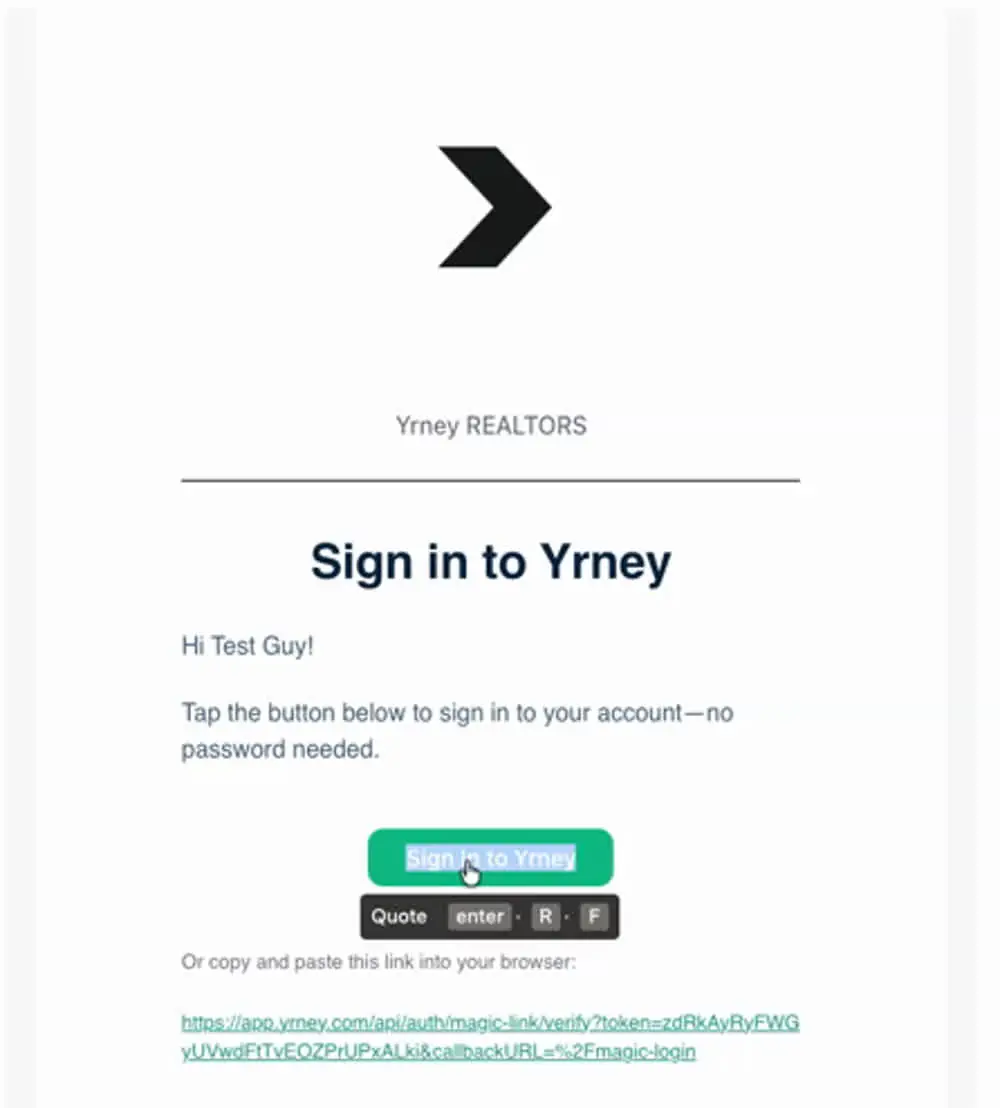
The sign-in link email — tap the button, no password needed.
Forgot your password?
Click Forgot your password? on the sign-in screen and follow the reset email.
Easier: a sign-in link
You don't actually need to remember a password. Enter your email, choose Email me a sign-in link, and Yrney sends you an email titled "Sign in to Yrney" from no-reply@yrney.com. Tap Sign in to Yrney in that email and you're straight in — no password needed. There's also a plain link to copy and paste if the button doesn't work in your mail app.
Nothing arrived? Check spam, and check you used the same address your brokerage invited. Sign-in links are single-use and expire, so if you're staring at an old one, just request a fresh link.
The Yrney mobile app is in private betaTasks, messages, and your calendar in your pocket — launching soon. Until then, Yrney works in your phone's browser.
Still stuck? Contact your brokerage's Yrney admin, or email support@yrney.com.
Agent basics · 3 min read
Your calendar: training, events, and RSVPs
See what your brokerage has coming up, and say whether you'll be there.
Under Company → Calendar you'll find everything your brokerage has scheduled — training, orientations, office meetings, CE classes, open houses, social events, holidays. You'll see company-wide events plus anything specific to your office.
Using it
Switch between agenda, week, and month views.
Open an event for the full details: description, venue or meeting link, and any attachments like slides or handouts.
Virtual and hybrid events have a Join button right on the event.
Filter by category or tag to cut it down to what's relevant to you.
RSVPs
If an event asks for an RSVP, answer it — some sessions have limited capacity, and your brokerage uses the count to plan the room and the materials. If your plans change, go back and update your response.
Getting reminded
The easiest way not to miss anything is to keep Yrney on your phone — when the mobile app launches, event notifications will land there instead of in an inbox you check twice a day.
The Yrney mobile app is in private betaTasks, messages, and your calendar in your pocket — launching soon. Until then, Yrney works in your phone's browser.
Still stuck? Contact your brokerage's Yrney admin, or email support@yrney.com.
Agent basics · 4 min read
Connect: messaging your office and your brokerage
Channels, direct messages, and announcements — all in one place.
Connect is messaging built into Yrney. It's where your brokerage posts announcements, where your office talks, and where you can reach anyone on the team without hunting for a phone number.
Channels
Your office channel — the local conversation for your location.
Company channels like #announcements and #welcome.
Topic channels — listings, leads, open-houses, training, marketing, general, random. Join the ones that are useful to you.
Direct messages
Message any agent or staff member directly. Every contact in the Need help? panel on your dashboard has a Message on Connect link, so you can go straight from "who handles commissions?" to asking them.
Announcements
When your brokerage sends a broadcast it can arrive in Connect, by email, and by text — important things reach you more than one way on purpose. Event announcements come with the details attached, so you can RSVP from the post.
Turn on notifications. Connect is where time-sensitive things land — a training moved, a deadline, an opportunity in your office. Keep Yrney on your phone so you see them the same day — and once the mobile app launches, push notifications will bring them to you.
Still stuck? Contact your brokerage's Yrney admin, or email support@yrney.com.
Agent basics · 2 min read
Yrney on your phone
Using Yrney mobile today, and what's coming.
Real estate doesn't happen at a desk.
Neither should your onboarding. Yrney is built to work on the phone you already have in your hand — between showings, in the car, at the closing table.
The Yrney mobile app is in private beta and launching soon. It isn't publicly available yet — when it is, your brokerage will send you the download link and we'll post it here.
Using Yrney on your phone today
You don't have to wait. Open Yrney in your phone's browser and sign in — the whole platform works there.
Go to your Yrney sign-in page on your phone and sign in, or use a sign-in link emailed to you — tapping it on your phone signs you in there.
Add it to your home screen so it opens like an app: on iPhone, Share → Add to Home Screen; on Android, the browser menu → Add to Home screen.
What works well from a phone
Feature
Why it's better on mobile
Your tasks
Check things off the moment you finish them, instead of remembering to later.
Signing documents
Sign your onboarding paperwork from anywhere — no printer, no desk.
Uploads
Snap a photo of a voided check or a certificate with your camera and upload it straight into the task.
Connect
Keep up with your office's messages without waiting until you're back at a computer.
Your calendar
Training and events in your pocket, with a Join button for virtual sessions.
The two-minute rule. Most onboarding tasks take about two minutes. Doing them on your phone, in the gaps in your day, is the difference between finishing onboarding this week and finishing it next month.
Still stuck? Contact your brokerage's Yrney admin, or email support@yrney.com.
Agent basics · 3 min read
Your profile, documents, and what only you can see
Keeping your details right, and finding what you signed.
Your profile is the source of everything your brokerage uses about you — your name as it appears on paperwork, your license number, your contact details, and your photo.
Keep these current
Phone number — it's how text announcements reach you.
Email — onboarding, sign-in links, and event notifications.
License and NRDS/MLS IDs — these get stamped onto forms and passed to your brokerage's other systems, so an error here shows up in several places at once.
Photo — your headshot appears throughout the platform. Your brokerage may also ask for a separate professional headshot for marketing.
Your HR Locker
Everything you sign or upload through a task is filed automatically under Company → HR Locker. You only ever see your own locker — never anyone else's. Same for tasks: you see yours, not the rest of the brokerage's.
If something looks wrong
Some fields you can edit yourself; others — like your commission plan or your office — are managed by your brokerage. If a detail is wrong and you can't change it, message your office admin from the Need help? panel and they'll fix it at the source.
The Yrney mobile app is in private betaTasks, messages, and your calendar in your pocket — launching soon. Until then, Yrney works in your phone's browser.